As for any computer systems or equivalent, it’s mandatory to backup properly your Home-Assistant system. Indeed, even with best quality hardware, it can fail and it’s better to avoid it ends up in drama.
Note: this tutorial is for the most common way to install Home-Assistant: HAOS. For installation in different ways, you’ll have to handle backup in a different way not covered in this article.
Two steps need to be covered here:
- Create the backup itself, that is just an archive of the whole installation, using existing feature in Home-Assistant, or with a dedicated tool for backup.
- Transfer backup to distant remote to prevent any loss of backups due to a major hardware issue. We’ll use an add-on to do that.
Reminder: To get an efficient backup solution, it’s mandatory to apply the famous 3-2-1 law: 3 copies of data with original one, 2 distincts support, and a remote one.
Local backup:
-
- Simple way (Method uses standard tools in HA: nothing to install): we are just going to create an automation that will call the system action of HA supervisor. It’ll allow to create for example a daily backup. Proceed to Settings -> Automations & scenes -> Create automation.
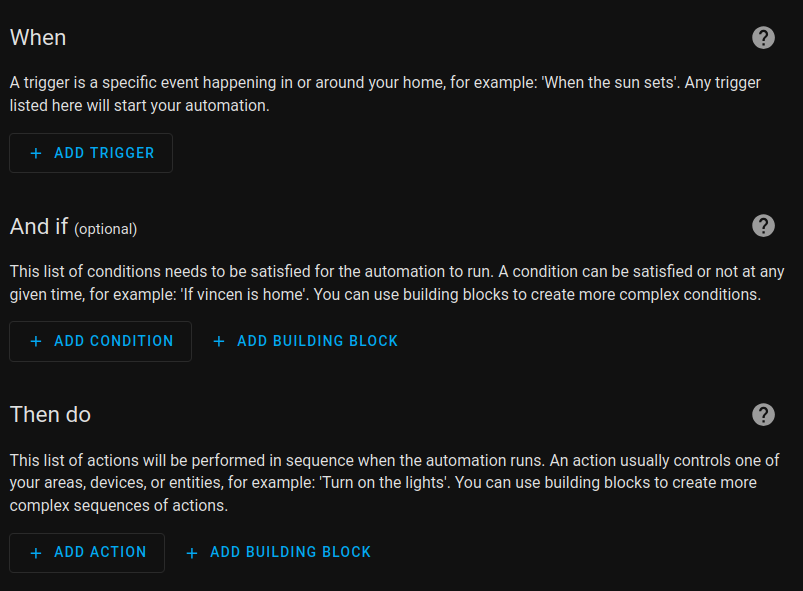
We are going to create a trigger based on time to run the backup everyday in the early morning, and as action Create a full backup, and so you should get something like below (everyday at 3am here).
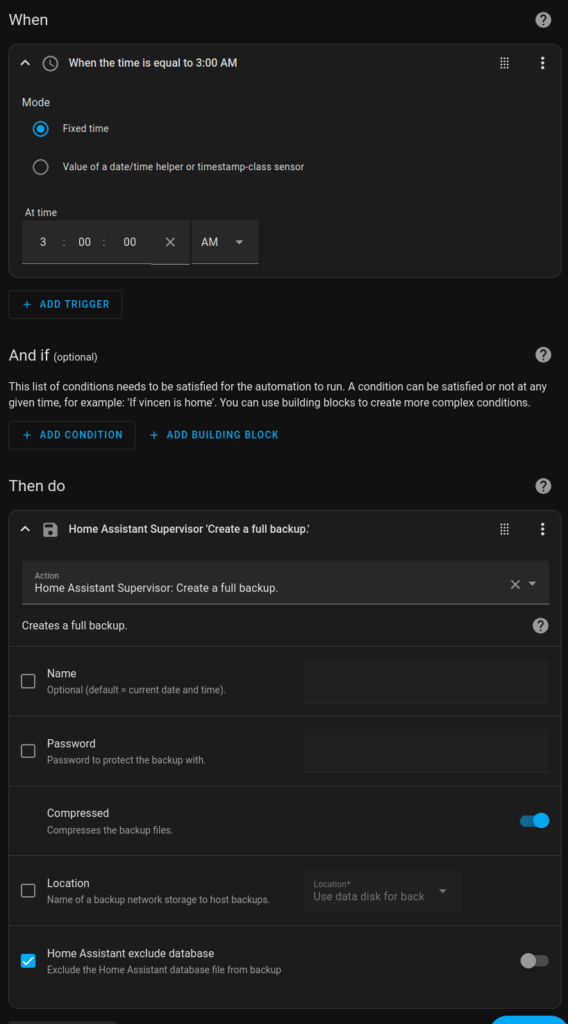
If you wish, you can customise name of backup files, but for our case we’ll use the default that is date/time and time of backup which is simple and easy. A password can be setup too for the archive (to store in a password manager !). We’ll select the option “Compressed” to optimise storage space and time to transfer them remotely. Location is avalaible if there is more than one storage volume avalaible in your HA setup. Last parameter, it’s possible to exclude database to limit backup size if you have a lot of sensors and/or your keep long time data.
To be sure everything is well setup for that step, you can run the automation one time manually. Once started, few minutes later, proceed to Settings -> System -> Backups, you should see a file listed with current date and time that is the backup archive you just created.
You can also use, instead of the Full Backup, the Partial backup. It’ll give you possibility to do selective backups by including/excluding some elements, and also to backup specific folders not part of standard HA directories.
Conclusion: simple and nothing to install but drawback: you’ll need to delete from time to time the oldest backups or you’re going to fill up all storage of your HA system and ends up to crash it.
-
- Less simple way: As seen with the simple way, backup system integrated into supervison is doing its work very well, but it doesn’t manage backup themselves et so to clean them from time to time. Although, a custom integration exists that is more flexible and fill the misses of Home-Assistant Auto-Backup is using the HA backup system but adds some interesting extra options. It can be installed either using HACS or manually by copying files in custom_components folder. Once HA has been restarted, you just need to add the integration through Integrations menu in HA. It’ll add an Action named Auto Backup, a sensor that gives feedback on backup process (to monitor if backup is done properly or not), and 2 blueprints: one to handle backups and one to generate alerts about backups.
First let see the blueprint named Automatic Backups.
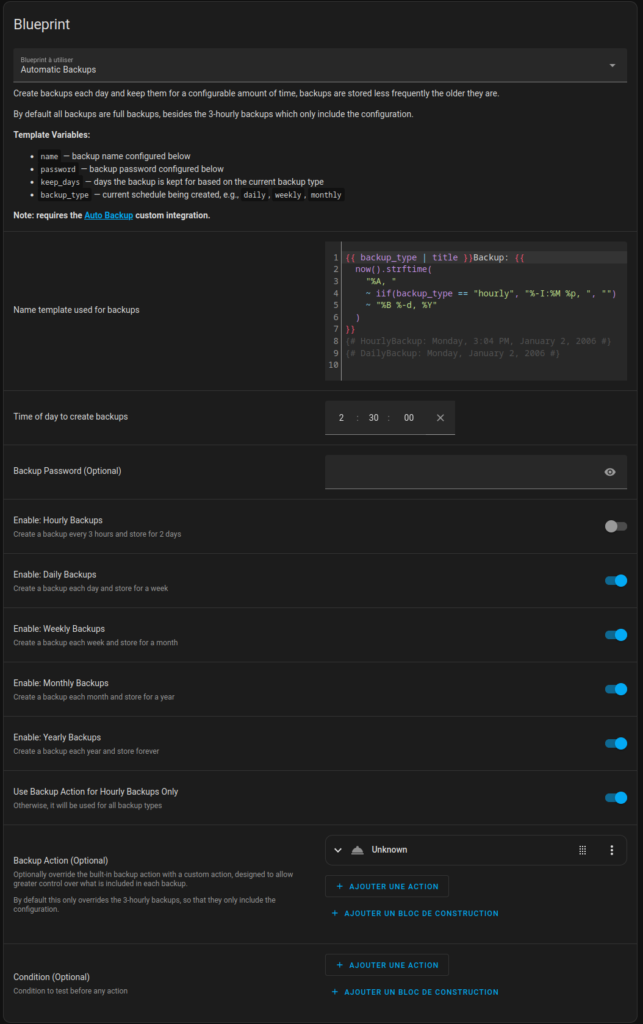
This blueprint contains all actions possible with Auto Backup. Let’s check them in details:
-
- Name template: to customise file name used for backups with more complex rules. By default, model includes in filename backup type (full/partial) and date it has been done. You can let code as it is or delete everything and in this case file will be just backup date.
-
- Time of day: as name tells it, time when to do the backup, usually in the night.
-
- Backup password: you can define a password for the backup (to use only if you have a password manager to store the password 😉 ).
-
- Enable Hourly/Daily/Monthly/Yearly Backups: to create easily hourly, daily, monthly, yearly backups with specific setup on how long to keep them.
-
- Backup Action / Condition: allows more complex configurations for backups but not much used. To get more details, it’s all documented here: Auto-Backup Advanced Examples.
Once saved the blueprint, it’ll create automatically the automation for it and from now, backup will be created according at rules selected.
Notifications (with Auto-backup)
To finish with Blueprints, we are now going to check the second one included with Auto Backup integration.
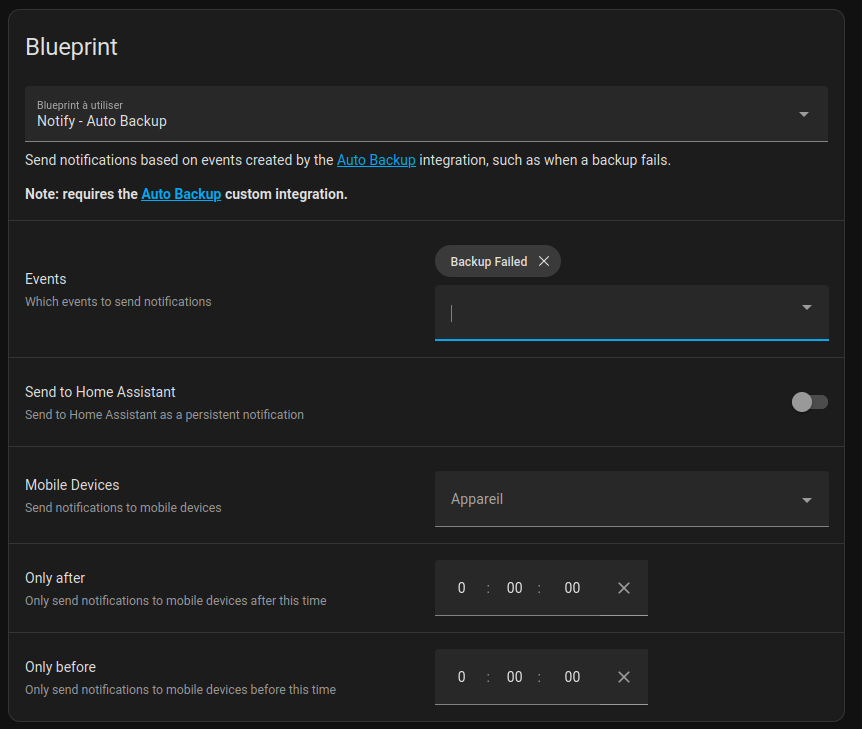
That blueprint will allow to send notifications for events created by backups automations. Indeed, it’s mandatory to be informed if backups are not done anymore properly or also to be informed if they are going well.
-
- Events: to select which events will generate a notification: Start, Successful, Purged (when it deletes old backups according at rules), and the most important: Failed.
-
- Send to Home Assistant: to create a notification that will show up in Lovelace interface.
-
- Mobile Devices: same but for mobile devices that are connected with HA.
-
- Only after / before: to define silent times where no notifications will be sent.
So now, you’ll be automatically updated for selected events. All we need now is to “send” our backups on a remote storage system, so we still get access at backups in case of failure in local storage system.
Transfer to a remote system
Now, we are going to install an add-on that will allow us to send backups to virtually any remote/online storage system (whatever it’s a basic system such as FTP, SCP or more advanced ones like Nextcloud, WebDAV, AWS…). The add-on, based on rclone, is an universal tool for files transfert, andy ou night already know it as it’s quite used.
To install that add-on, go to Settings -> Add-ons -> Add-ons store then click on the 3 dots at top right -> Repositories and we copy/paste that URL: https://github.com/jcwillox/hassio-rclone-backup. Once added, reload the page and then Rclone add-on should show up and you just need to click on Install button. Once installed, we’ll need to create a configuration file for rclone so it can connect at storage system you want to use.
Easiest solution to create the configuration file is to download rclone on your computer. It exists for all platforms including Mac: RClone téléchargements Once downloaded, you can run it straight using that command:
rclone configRclone is going to guide you step by step to configure access at a storage system. List of all storage systems rclone is able to handle is listed here: https://rclone.org/overview/. Warning, some storage systems like Nextcloud, Owncloud for exemple, use WebDAV protocol, lot of them use also AWS protocol even if they are not Amazon… All you need is to follow indications of rclone to configure properly your storage system for Rclone. Depending of storage you configure, it can be as simple as just supply the credentials to access the storage, sometimes it’ll ask you to generate an identification token. Once done with the process, Rclone will create a file named rclone.conf. We are going to copy this file in config directory of HA (either using the Samba add-on, or through File manager in HA).
Once copied, we can now start Rclone add-on that should start without any issue. Once started, you can access the left side tab “Rclone Backup” in HA. Tab Explorer allows you to browse the remote storage that you have configured. You’ll be able to see there the backup transfered by Rclone.
All we need now is to configure Rclone to send files according at our rules. Configuration tab includes a default configuration that we’ll be able to modify according at our needs. I’ll start with the default configuration and comment each options.
- name: Sync Backup daily
  schedule: 00 4 * * *
  command: sync
  sources:
    - /backup
  destination: NC:/Auto
  include: []
  exclude: []
flags: {}-
- name: name you give at that schedule.
-
- schedule: we have to encode backup times using “cron” method. Syntax is mm (minute) hh (hour) jj (day) MM (month) JJJ (weekday). Here, in our exemple, rclone will trigger everyday at 4 am.
-
- command: here you decide to do a backup or a sync. If we select sync, rclone will keep a pesfect copy of HA backup folder in remote folder configured. If it’s copy, rclone will copy all new files present in HA backup folder but will never delete any files in your remote storage, which is the proper way to do a backup.
Warning: if you use copy option, it’s mandatory to delete periodically useless backups stored in remote storage or you’ll use all space avalaible.
-
- sources: allows to backup extra folders out of the backup one (/backup) included by default. As many folders as you wish can be listed.
-
- destination: you list one or more destinations that have to be used to transfer backup. Syntax is that one: name you have given at storage when you created the conf file of rclone, followed by the usual access path where we want to store files or just /
-
- include / exclude: allow to add specific elements to standard backup such as a directory created in HA or extra files.
You can now save the configuration and start the add-on. Don’t forget to activate also these options: Start on boot, Watchdog, and Show in sidebar for an easy access at Rclone GUI.
Once started, you’ll have to wait the expected runtime of Rclone to check everything is going well. When an Rclone upload process will start, something similar at text below should show up (Rclone updates status of transfers every minute):
[2024-10-05] [04:00:00] [INFO]: running "Sync Backup daily"; /backup -> NC:/Auto
[2024-10-05] [04:00:00] [INFO]: renamed 5 backups
2024/10/05 04:01:01 INFO  :
Transferred:   	  234.559 MiB / 334.561 MiB, 70%, 3.499 MiB/s, ETA 28s
Checks:                 4 / 4, 100%
Transferred:            0 / 1, 0%
Elapsed time:       1m0.8s
Transferring:
 *                      Saturday_Oct_05_2024.tar: 70% /334.561Mi, 3.499Mi/s, 28s

2024/10/05 04:01:36 INFO  : Saturday_Oct_05_2024.tar: Copied (new)
2024/10/05 04:01:41 INFO  : Monday_Sep_30_2024.tar: Deleted
2024/10/05 04:01:41 INFO  : Sunday_Sep_29_2024.tar: Deleted
2024/10/05 04:01:41 INFO  :
Transferred:   	  334.561 MiB / 334.561 MiB, 100%, 1.733 MiB/s, ETA 0s
Checks:                 6 / 6, 100%
Deleted:                2 (files), 0 (dirs), 1.266 GiB (freed)
Transferred:            1 / 1, 100%
Elapsed time:      1m41.4s

[2024-10-05] [04:01:41] [INFO]: unrenamed 5 backups
[2024-10-05] [04:01:41] [INFO]: finished in 1m41s
[2024-10-06] [04:00:00] [INFO]: running "Sync Backup daily"; /backup -> NC:/Auto
[2024-10-06] [04:00:00] [INFO]: renamed 6 backups
2024/10/06 04:01:01 INFO  :
Transferred:   	  210.715 MiB / 374.033 MiB, 56%, 3.048 MiB/s, ETA 53s
Checks:                 5 / 5, 100%
Transferred:            0 / 1, 0%
Elapsed time:       1m0.8s
Transferring:
 *                        Sunday_Oct_06_2024.tar: 56% /374.033Mi, 3.048Mi/s, 53s
Once all transfers and perhaps some file deletions (if you have selected sync option) have completed, something like below will appear:
2024/10/06 04:01:59 INFO  : Sunday_Oct_06_2024.tar: Copied (new)
2024/10/06 04:01:59 INFO  :
Transferred:   	  374.033 MiB / 374.033 MiB, 100%, 2.402 MiB/s, ETA 0s
Checks:                 5 / 5, 100%
Transferred:            1 / 1, 100%
Elapsed time:      1m59.0s

[2024-10-06] [04:01:59] [INFO]: unrenamed 6 backups
[2024-10-06] [04:01:59] [INFO]: finished in 1m59s
Your system is now backuped automatically and backup are in a safe place. So now, even if worse should happen with your HA system, you’ll just need to download the last backup and restore it on a brand fresh HA system to get your system fully working againl !
You wish to install an efficient, cost-effective, and open system with Home-Assistant for your house, property, building… ? Feel free to contact us !
Recent Comments