You have some sensors or other devices connected through Lora at open network TTN (The Things Network, and the commercial version: The Things Stack) and you wish to get all these datas into Home-Assistant, here is how to do it. Two solutions are avalaible: one quite basic but easy to setup, and one a little more complex but allows full communication with Lora network.
PS: Official integration (Home-Assistant TTN Official Integration) is no more usable since a year due to major upgrade of TTN and its API that took place in 2021/2022.
Easy but limited solution:
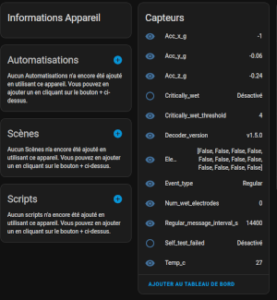
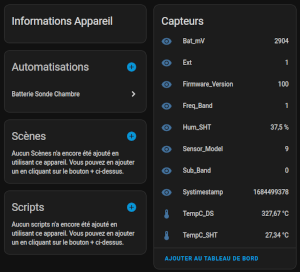
Through a custom integration (that is an updated version of official deprecated TTN V2 integration), it’s possible to connect very easily TTN with HA: https://github.com/angelnu/home_assistant_thethingsnetwork (to install using HACS or by hand in custom_components directory). Once setup and after HA restart, your Lora devices will show up in HA as below examples.
Right; temperature/humidity sensors manufactured by Dragino LHT-52, left: water leak detector made by Laiier Severn WLD). Depending of sensors, a little of configuration might be needed using the Configure button on integration.
Main points of easy solution:
- Facile à installer et paramétrer
- Remontée aisée des capteurs
- pas de support (le développeur ne supporte pas l’intégration donc il vous faudra recourir aux forums et aux copains pour l’aide en cas de soucis).
- Certains appareils LORA comme les boutons ne sont pas supportés par l’intégration et donc n’apparaîtront pas, ou les capteurs avec des variables non standards.
- Impossible d’envoyer des downlinks aux appareils Lora si souhaité.
Solution avancée (“geek”):
Ici on va recourir à la bonne vieille solution du broker MQTT. Pour ceux qui ne connaîtraient pas encore MQTT, il s’agit d’un dispositif logiciel pour distribuer des courts messages, typiquement pour l’IoT. Il s’agit d’un protocole très léger mais qui peut être sécurisé si besoin est et qui bien sûr est nativement géré par HA ! Pour ceux qui voudraient en savoir plus sur MQTT, Wikipédia en donne une description simple et claire sur cette page 😉
Première étape (probablement inutile pour la plupart d’entre vous): installer le module complémentaire/add-on MQTT Broker. Une fois installé, s’assurer que seules les options suivantes sont activés dans le module (you’ll need also to create the mosquitto directory in /share folder of HA):
active: true
folder: mosquitto
Une fois installé, vous pouvez installer l’irtégration officielle MQTT Broker. Une fois installé et démarré, elle va automatiquement se configurer pour communiquer avec le broker MQTT précédemment installé.
On va laisser de côté HA un instant pour continuer la configuration côté TTN/TTS. Il va falloir se rendre dans la console TTN (The Things Network Console (Europe) pour ceux qui utilisent la passerelle européenne en fonction de votre emplacement goégraphique), dans la rubrique Applications puis choisir l’Application dans laquelle se trouve l’appareil Lora dont on veut récupérer les informations.
On va alors choisir dans le menu de gauche: API puis “Add API key”. On lui donne un nom (cela est juste pour nous comme repère), une éventuelle date d’expiration sinon on laisse vide, et pour les droits vous pouvez laisser par défaut tous les droits (dans l’absolu seuls Write Downlink application traffic, et Read Application Traffic sont nécessaires) et une fois validé bien sauvegarder la clé d’API qui ne sera plus jamais accessible après en clair.
Il nous reste à récupérer l’ID de l’appareil LORA avec lequel on veut interagir et pour cela on va aller dans le menu “End Devices” du menu de gauche et cliquer alors sur l’end-device qui nous intéresse et on pourra alors récupérer l’ID de l’appareil.
Une dernière étape très importante ici est de configurer le “Payload Formatter”. Le payload formatter est en général un Javascript qui va se charger de décoder le message reçu de l’appareil LORA pour en extraire de façon claire les informations utiles. Exemple ici avec ma sonde d’ambiance LHT-52 avec à gauche le payload reçu de l’appareil tel quel, et une fois décodé à droite:
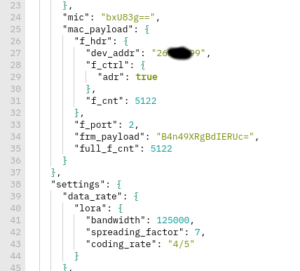
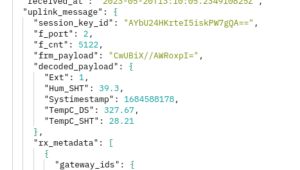
Pour disposer de ce décodage automatique, deux possibilités: votre appareil Lora est connu de TTN et auquel cas vous pouvez tout simplement choisir l’option “Use Device Repository” dans Payload Formatters -> Uplink, et si votre appareil n’est pas connu de TTN, il vous faudra récupérer le décodeur du fabricant de l’appareil LORA et le copier/coller dans TTN.
Pour vérifier que cela fonctionne correctement, il vous suffit d’attendre l’envoi d’un message LORA par votre appareil et de consulter la console TTN (Onglet “Live Data”). Lors de l’émission d’un message par votre appareil, il va y avoir un “Receive Data Message” où vous verrez le payload encore encodé comme à gauche ci-dessus et ensuite un “Forward Uplink Message” dans lequel les données sont décodées et prêtes à être exploitées par HA. Si vous n’avez pas les données en clair, il faut d’abord résoudre ce soucis avant de continuer plus avant.
Désormais il ne nous reste plus qu’à faire un peu de configuration dans HA pour récupérer nos infos d’appareils LORA.
Tout d’abord on va relier ou “bridger” le broker MQTT de HA avec celui de TTN. Pour cela on va devoir créer un fichier bridge.conf pour MQTT qui lui dira comment faire la liaison. Ce fichier doit être placé dans votre dossier “share” da HAOS (ce dossier n’est pas accessible par l’éditeur de fichier de HA, il faut y accéder par le partage de fichiers de HA). Dans ce dossier share, vous créez s’il n’existe pas un dossier mosquitto et dans ce dossier vous créez un fichier bridge.conf (un seul fichier suffit pour tous les bridges que vous créerez !). Ce fichier contiendra les éléments suivants:
connection lenomquejeveux
address eu1.cloud.thethings.network
bridge_protocol_version mqttv311
remote_username iddemondevice@ttn
start_type automatic
notifications false
try_private false
remote_password NNSXS.xxxxxxxxxxxxxxxxxxxxxxxx
bridge_insecure true
topic # in 0
cleansession true
lenomquejeveux vous permet de nommer le bridge (c’est purement pour vous et doit être unique pour chaque bridge déclaré dans le fichier bridge.conf), eu1… doit être remplacé par le serveur TTN que vous utilisez selon la région du monde où vous vous trouvez, iddemondevice est à remplacer par l’ID du device précédemment récupéré dans la console TTN, et pour finir dans remote_password vous y collez la clé d’API que l’on a précédemment généré.
Vous pouvez alors redémarrer le module complémentaire Mosquitto Broker dans HA, et si tout est bien configuré, vous devriez voir cela dans les logs du module complémentaire:
1684589377: Loading config file /share/mosquitto/bridge.conf
1684589377: Warning: Bridge monbridgeamoi using insecure mode.
Si vous avez bien ça, c’est parfait, cela veut dire que le broker MQTT de HA communique bien avec celui de TTN et que l’on va automatiquement recevoir les données envoyées par nos appareils LORA.
Il ne nous reste plus qu’à extraire les données qui nous intéressent pour les exploiter dans HA. La structure du message reçu de TTN est en JSON, cela va donc être assez simple à récupérer. Voici un cas simple et concret avec notre capteur de température/humidité LHT-52.
En examinant les messages envoyés par la console TTN, voici ce qui apparaît en dehors des entêtes et autres informations qui ne nous intéressent pas:
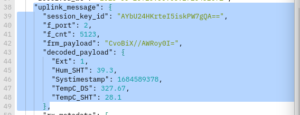
On va alors pouvoir ajouter un capteur MQTT dans HA qui extraira automatiquement la valeur qui nous intéresse de la façon suivante:
 sonde-ambiance doit être remplacé par l’ID de votre application dans la console TTN
terrasse doit être remplacé par l’IP de votre appareil tel qu’il apparait dans la console TTN
Pour réduire le risque d’erreur et pour ceux qui sont sous Android (il doit probablement exister l’équivalent sous IoS mais je n’ai pas d’appareil IoS), il existe une application très pratique qui s’appelle MQTT Snooper qui vous permet de voir tous les messages MQTT sur un broker. Une fois installé l’application, vous ajoutez un nouveau host (vous indiquez comme serveur le serveur de TTN, en username l’id de l’application TTN suivi de @ttn et en mot de passe la clé d’API). Une fois connecté, vous verrez automatiquement passer les messages MQTT émis par TTN et facilement reconnaître les champs que vous souhaitez extraire.
Recent Comments